Add and manage to-dos
Keep follow-up calls, forms to send, and other loose ends in your to-do list. Add a to-do for your practice or link it to a client, then update it as your work changes.
1. Open your to-do list
On the dashboard, choose To-dos in the dashcard. This list shows your open to-dos across clients, including to-dos without a client.
To work with one client's list, open that client from Clients, choose Open full client page if a preview opens, then choose To-dos in their workspace. New to-dos added there belong to that client automatically.
2. Add a to-do
- Enter a title in Add a to-do….
- On the dashboard, optionally search for and select a client in Client (optional). Leave it empty for a practice to-do. To clear a selected client before adding, choose No client in the picker. The client workspace does not need a picker.
- Optionally choose a Due date.
- Choose Add to-do (the plus button).
The title is required and can contain up to 200 characters. After adding, the title field clears; your chosen client and date remain selected for the next to-do.
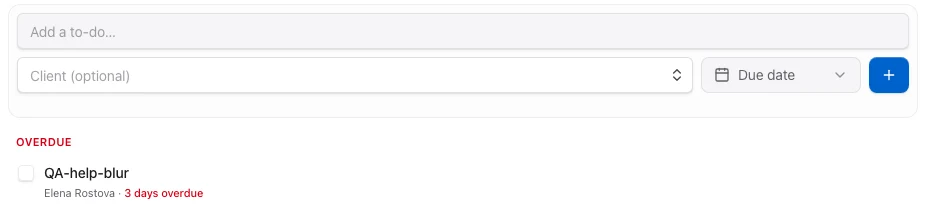
The dashboard list groups open to-dos by due date and shows the linked client beneath the title.
3. Add suggested to-dos
A client's To-dos tab can suggest the standard touchpoints for their kind of care, such as prenatal visits and the postpartum debrief, with dates already worked out.
Suggestions appear when the client has a care type other than custom and a date to count from: their due date for birth or birth and postpartum care, or the start date set in their care roadmap. Postpartum and consultation clients need a care roadmap with a start date. The steps come from your care package for that type of care, or the built-in one if you haven't saved your own.
- In the client's To-dos tab, find Suggested from above your list and choose Review.
- Check the to-dos you want. Upcoming ones and today's are checked already. Ones whose date has passed are marked Past and start unchecked; if you add them, they show as overdue.
- Choose Add (for example, Add 4 to-dos).
The new to-dos are linked to the client and also appear on the dashboard. Next time you open the tab, only the suggestions you haven't added are offered.
Right after adding a birth or birth + postpartum client with a due date, the same checklist is already open below Client summary. Choose Add to save your selection, then View to-dos to open the client’s list. On this screen, Not now only hides the checklist until you leave; the notification’s Undo brings it back. Suggestions remain available on the client’s To-dos tab.
From a client’s Care tab, an active Care roadmap also lets you add one touchpoint at a time. Choose Add to to-dos beside a touchpoint; its title and date are saved for the client, and the row shows Added to to-dos. Choose View to-dos above the roadmap rows to open the list. The estimated due date is a date marker, so it has no to-do action. Past touchpoints can be added as overdue work. Completing one keeps its Added confirmation; deleting it makes it available to add again. Add to calendar remains a separate action.
From the client’s To-dos tab, to hide the suggestions for this client, choose Not now. This applies on all your devices. To see them again, choose Show suggested to-dos under the list.
4. Edit a to-do
Point to a row to reveal its pencil button, or reach it with the keyboard. Choose Edit for that to-do.
- Change the title, then press Enter or move focus outside the editor to save.
- Press Escape to cancel unsaved title changes.
- Choose a date to save it immediately, along with any title change. Use Clear date in the date picker to remove the due date.
Moving between the title and date controls keeps the editor open. Clearing the title does not save a blank to-do; the previous title is kept.
5. Finish or delete a to-do
Select the checkbox beside a finished to-do. It is crossed out and leaves the open list. The To-do done notification offers Undo for five seconds; choose it to return the to-do to your list.
Before you continue: Deleting removes the to-do. The completion notification's Undo does not apply to deletion.
To delete, point to the row or focus its controls, choose its trash button, then choose Delete to-do in the inline confirmation. Choose Cancel to keep it.
Check the result
Open to-dos appear under Overdue, Today, Coming up, or No date. Reload the page to check that an addition or edit was saved. A client-linked to-do appears in both the dashboard list and that client's workspace list.
When open to-dos are due today or overdue, the dashboard's priorities include a to-do due or to-dos due row. It shows the overdue count when applicable. Choose Review to-dos to open the list in place. The dashcard's tabs stay available.
If something goes wrong
- The title is empty: enter what needs doing; the form shows Write what needs doing.
- The list could not load: choose Try again beside Couldn’t load your to-dos. Nothing on your list means the list loaded with no open to-dos.
- Suggested to-dos don't appear: check that the client has a due date or a care roadmap start date and a care type other than custom. Once every suggestion has been added, the offer no longer appears.
- Suggested to-dos couldn't be added: choose Add again; your selection is kept.
- An edit fails: read the error notification and keep the editor open while correcting the entry. Check the saved row after retrying.
Next step
Was this article helpful?
Still need help?
Contact Yves with your question, or arrange a walkthrough together.